
After making the first three starters and Pikachu this model felt a little overdue. I had even been asked by several people “when are you going to make Eevee?” haha. Well, it’s finally here a super cute fluffy little Eevee model in a low-poly style.
Read MoreSomething fishy

It’s been quite a while since my last post. That’s because I’ve been so busy! Not just with my latest model, the Goldfish diorama, but because I’ve also been trying to improve in some other areas, like putting out more instructional videos and improving the quality of the SVG and PNG files.
Initially, I actually intended to make a complete fishbowl diorama complete with “glass” for the bowl and everything. I even mused about putting in a castle or a treasure chest haha. When I started modelling it however I realized I needed to scale it back or else it would just be too complex. So I went with a bunch of simple plants and two fish, similar to what made it into the final piece.
After building most of the first prototype though I realized that I hadn’t scaled it back enough as it was still too complicated. The goldfish were about half the size they are now, the plants were also a bit on the small side, and making the glass of the bowl was too finicky and resulted in a lot of ugly crinkles. So I went back to the drawing board as they say.
While I was working on the first prototype I ended up taking some WIP shots that ended up being the inspiration for the final design. I had taken a picture of one of the fish that was attached to one of the plant clusters and when I looked back on it I thought that was a much simpler idea. I also made it larger so that it would be easier to assemble compared to the first design.
The second design was simpler and turned out much better than the first. I still wasn’t quite happy with it though and ended up making some more changes. The proportions of the fish seemed a little off so I had to adjust them. For some reason, I thought it would be fine to make all of the fish and plants first and then build the base around them but this just resulted in a lot of wobbly plants and made it harder to put the base together. So I changed it so the base is built first and the plants and fish are attached using the “socket method” I developed (or at least that’s what I call it :p). That method makes things so much easier but for some reason, I don’t always think to use it right away haha.
After that I had a lot of issues taking the pictures. I’ve never considered myself a good photographer but I think I’ve at least improved a lot over the years. All of that went out the window for this project and I had to re-teach myself how to take decent photos over three separate sessions, each one an improvement over the last session haha In the end I got results that I can live with and was able to complete the project.
Now, the issue I always have is the issue of what to do next. It’s always a fun problem though as there are always many exciting new ideas floating around. I have a few that I think are a tad overdue though so I think it’s a bit simpler to decide this time. That’s probably the only clue you’ll get because, as always I won’t say what until I feel it’s time. So you’ll just have to wait patiently until then. :)
Thanks for reading and Happy Crafting!
The Papercraftsman
Pikachu, I choose you!
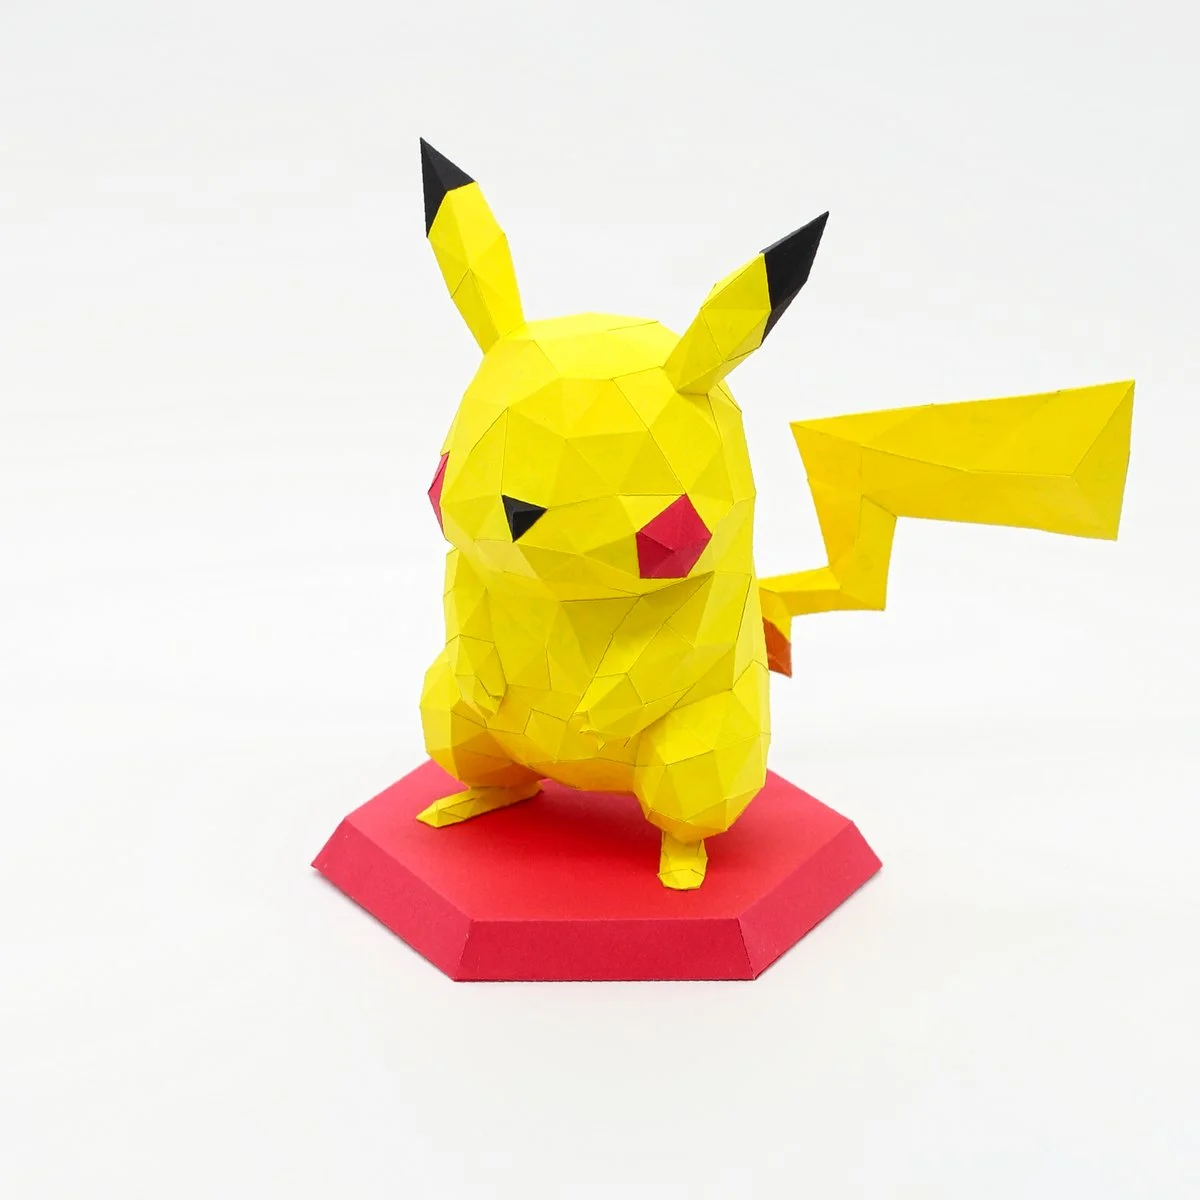
It’s Pikachu, the cute and loveable electric mouse! I had been meaning to make a Pikachu model for a while now actually but just didn’t have the confidence to pull it off.
I didn’t have much experience designing and building my own models when I first started this. I pretty much only built other people’s designs, like I’m sure most people who get into this hobby do. Eventually, though I felt the desire to explore my own creativity and make my own models.
I initially started with Pokemon because they were shapes and forms that I was very familiar with so I felt it would be easier to replicate and sort of use them as a self-teaching aid. I thought about making Pikachu right after the three Kanto starters but I felt it wouldn’t turn out as nicely, mostly because of the tail. Charmanders flame tail had actually given me some problems when I first made it and that was only the tip of the tail. Pikachus tail is pretty much all really thin so at the time I didn’t feel like it would turn out very well.
My experiences with other models with smaller parts gave me more confidence as I went on though. The Goombas eyebrows were probably the next feature that tested me a little. Then came the Rose which really made me re-think how I approach the smaller thinner bits. So when I finally got around to making Pikachu the tail wasn’t actually that difficult to deal with.
The biggest issue I had actually was simply getting him to stand up! The position of his feet and the lever action of the tail meant that there was pretty much no way for him to stand up on his own. At first, I tried weighing down his feet but it didn’t seem to be enough. I eventually decided to just put him on a little display stand and it work perfectly! In hindsight, I should have anticipated a situation like this and put all the Pokemon on stands to match. There’s nothing to say that I couldn’t make some stands for the existing models though, it really didn’t take that much time haha
This probably won’t be the first time I make a Pikachu either. One thing I have been meaning to improve on and learn is how to make my models in more interesting poses. I’m still learning on the 3D modelling side of things but I feel like I might be getting to the point I that I might need to try and learn some more features and techniques. In addition to that I got some very fun and interesting ideas from some people regarding Pikachu that I’m very tempted to try. That’s all I’m going to say here for now though haha.
Thanks for reading and happy crafting!
The Papercraftsman
Not very spooky

Here we are in late October, the leaves have changed colour and there is a frosty chill in the air. That’s when people want to see cute little ladybugs, right? I know it’s not very fitting with the season but I’m the type of guy that likes to finish what I start, so when the idea popped into my head halfway through the bee I felt the need to see it through to the end.
Overall, I’m pretty happy with how this one turned out. I have been messing around with using triangular grids for the models and tried to apply some of what I learned to this one. It’s probably most evident in the eyes which I’m sure people will agree look much better than the bees eyes which are a tad blocky.

I’m not sure how often I will use them in the future though as I find does significantly increase the polygon count, which also increases the amount of potential parts, which increases the amount of cuts and folds required. All of that is fine for me to do, I personally don’t mind the added complexity, but I am always thinking about other potential builders. I know not everyone wants something so “involved” especially if they’re just getting into papercraft so I always try and keep that in mind. I could always just be overthinking things though haha
Thanks for reading and happy crafting,
The Papercraftsman
A buzzing little bee.
My latest model is a cute little bee!

I felt I needed to do something a little simpler compared to my previous models as well as make something that was completely my own design. I also decided to make this my first “premium” model as well, a term I’m not thrilled with to be honest, but it was the only thing I could think of at the moment. I still plan on making free models though, so don’t worry if you don’t have money to spend on papercraft! Generally, going forward if anything I make is based of an existing copyrighted design it will be free and if it’s my own design there will most likely be a price attached to it. Anyway, back to talking about the bee!

I was mostly inspired by the beehive in my sisters backyard. She let a local apiarist store a hive there this summer and it was very interesting to say the least. Whenever I was over there visiting I would spend some time observing them coming in and out of the hive. It’s oddly calming watching a bunch of tiny insects go about their tiny lives. At a glance, it seems like chaos but at the same time you know there is a function and purpose to it. Hundreds of tiny bees, each with a task to perform in order to keep the hive functioning. They don’t need to be told what to do or how or when to do it, they just instinctively know. I’m still not really sure why, but thinking about that is what felt so calming.
I also figured that each bee must be pretty content in its role in the hive which is what I tried to convey in my papercraft pattern. I gave it a small like smile that says “I’m happy” and small little legs that look like they’re relaxed and dangling. Combined with the bulging eyes and rotund body these features result in a bee that looks like it doesn’t have a care in the world, content to just go about it’s tasks.
Thanks and happy crafting,
The Papercraftsman
Squirtle
A brief discussion of my Squirtle papercraft model.
Read More