
What is papercraft and how do I do it?
The simplest way to describe it is that papercraft is a form of arts and crafts where you craft something out of paper, hence the name. There are a lot of different varieties of papercraft and you might have actually done some already. Some types of papercraft include scrapbooking, card making, papier mâché, and origami. In my experience, the exact term “papercraft” typically refers to making 3D models out of paper and that is what this website is dedicated to.
Below I will list what you need to get started and go through the basic steps in the process so you can decide if it is something you want to try.
What you need
To make a papercraft model you will need:
glue - preferably white glue or “school” glue as it is sometimes referred to
scissors or a craft knife
paper - I recommend a weight of around 24lb but any type can work and everyone has their own preference
a pattern - either from here or some other source

Step 1 - Download and print
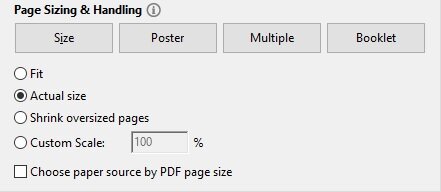
I know it sounds like an obvious step but there is something I would like to point out that could save you some paper and confusion. When printing any document, the default option under “Page Sizing & Handling” is usually set to “Fit”. When printing a papercraft pattern this can cause problems up by changing the size of the pieces, making it so they won’t fit together right. To avoid this make sure you select “Actual size” to ensure that the pattern is printed in the size the creator intended.
Step 2 - Cut out the parts

Using your scissors or craft knife simply cut along the outside edge of each piece, taking care not to cut off any tabs or cut into the part itself.
Note: you don’t have to cut out all of the parts all at once if you don’t want to. I recommend only cutting out the next 4-5 pieces you will need to ensure that you don’t loose any.
If you have a Cricut, or some other brand of craft cutting machine, you can use the provided DXF or SVG files to cut out the parts you need! Check out the video below if you need any help setting them up properly.
Step 3 - Folding
Once you have your pieces cut out it is time to fold them. Most patterns use solid and dashed lines to indicate which direction the part needs to be folded in order to fit together correctly. Not all creators use the same labels so it is best to check and see if there are any notes or legends on the pattern to help you read the pattern.
Notes: if you want nice crisp fold lines then simply take a straight edge like a ruler and object with a dull fine point and trace each fold line before folding, taking care not to cut through the pattern.

Step 4 - Gluing the parts together
Once your parts are prepped and ready you can start gluing them together. Start by identifying which pieces go together and fit them together with out any glue, that way you run less risk of gluing the wrong pieces together. Some patterns have their tabs and their corresponding edges numbered, while some patterns come with instructions that show the proper orientation of the pieces when put together. Once you are confident you know how they fit, apply a small amount of glue to one of the tabs and press it in place. Once in place repeat with the next tab, and the next tab, and the next, until all tabs have been glued and you can move on to next piece.
Note: Sometimes tabs can slip while you are moving another one in place. To avoid this let the first one dry until it won't move before working on the next tab.
